Two-handed Backhand
This stroke is perhaps the least well-understood weapon in the game. While it is by far the most popular backhand groundstroke among pros and duffers alike, few know its full capabilities. Firstly, it is not a full stroke like the one-handed backhand; it is a short stroke like the volley. The consequences of that fact alone are massive. A short stroke doesn't make use of a long, luxurious lag phase to accelerate the racket head and maximize racket head speed and pace. That means that no matter how much oomph you put into the shot, the pace you can get with the two-hander is limited. On the other hand, having two hands on the racket means that leverage is excellent, so moderate pace is easier to generate. The accuracy of the two-hander is unmatched, as is its overall consistency, but the degree of topspin and the depth of shot are disappointing compared to the one hander. Its compact backswing while still maintaining the ability to add moderate topspin makes it the best shot for returning a heavy serve, hands down. It isn't much for adding backspin to the ball, so following it to the net is a dicey proposition. The ability of the two-hander to handle high balls has been unfairly impugned by those who don't realize that they are dealing with a two-handed volley. They try to take a big, impotent swing at the ball instead of just snapping it by counter-rotating the wrists. On the minus side, having two hands on the racket does cut down on one's reach at the net and when trying to track down wide-hit balls on the baseline.
The two-hander is not a full stroke like the one-handed backhand; it is a short stroke like the volley.
The two-handed backhand (2HBH) is a unique and deadly weapon that, when used properly (and backed up by a reliable one-handed slice), will encourage your opponents to hit to your forehand.
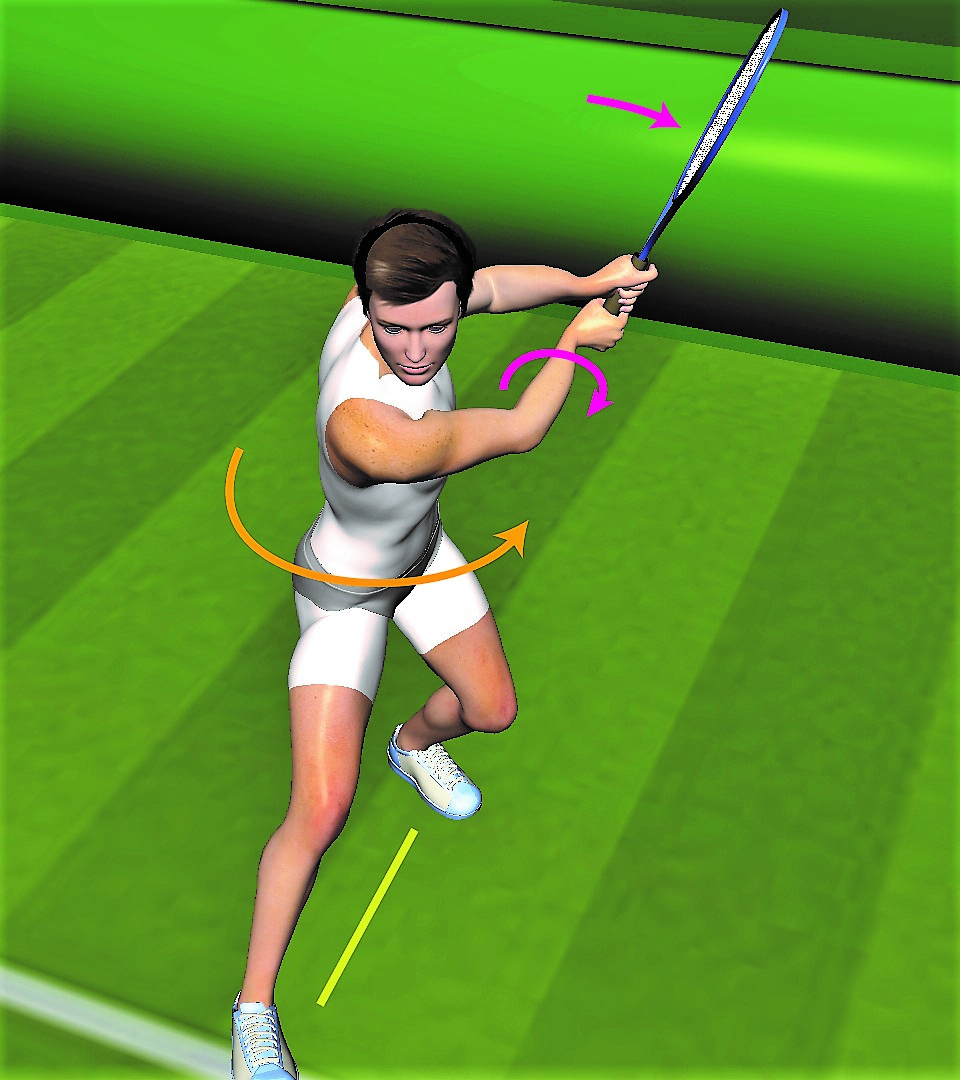
The left elbow muust be extended and locked during the pose and stay that way until the later part of the follow through.
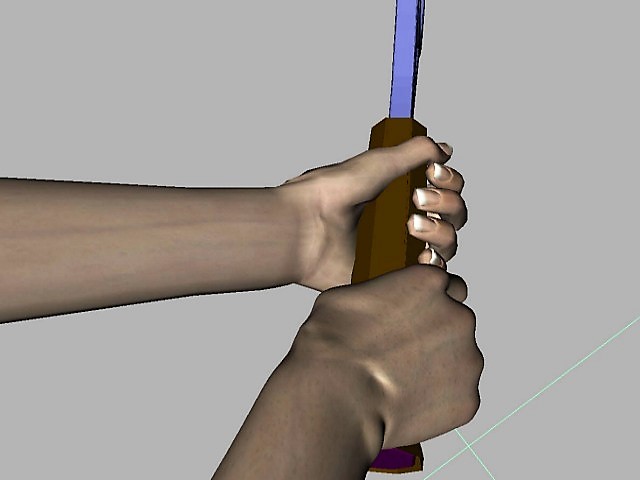
The key elements of the 2HBH pose are high racket head, reaching back with the right superficial and deep shoulder joints, stance slightly open to moderately closed depending on the target and right forearm supinated (racket not laid back).
Foundations
The Pose
Right forearm supination in the pose and lock is critical for both control and power as it permits storage of supination force during the load.
The left elbow muust be extended and locked during the pose and stay that way until the later part of the follow through. 'Shoving' the ball with the left arm is right out! The left arm serves as the fulcrum around which the right wrist-racket complex pivots. Remember that Leverage = Power = Control!
Right arm supination in the pose and lock is critical for both control and power as it permits storage of supination force during the load.
The high wrist and racket head create the opportunity to use gravity, rather than muscular tension, to motivate the racket during the lock phase. Use of gravity is a common practice in tennis strokes; used to good effect in slice groundstrokes, the topspin forehand, and the serve. It is particularly important in the 2HBH because of a tendency to get tight with the stroke owing to its compact, violent nature. The stroke follows the same physics as any other stroke in that the arms and shoulders must be relaxed at the end of the lock phase when the power wave hits and draws the racket into the load. If the muscles are tight going into the load, stretch shortening fails and there is no control and suboptimal spin.